
Holy Grail Kitchen Hacks That Stepped Up Our Cooking Game
Put Onions in the Freezer before Chopping — Your Eyes Will Thank You
This might help to keep your eyes from watering while you are Cutting Inions up there are other uses such use Ice Cubes but we are using Frozen onions here in this post. When you cut an onion, you release a chemical called syn-propanediol-S-oxide which, when it combines with the moisture in the atmosphere, results in sulfuric acid which can irritate your eyes a little bit and hence we cry. This is the acid causing burning and tearing of the eyes. The only catch is — while chopping onions, freezing it actually breaks the cells in the onion.
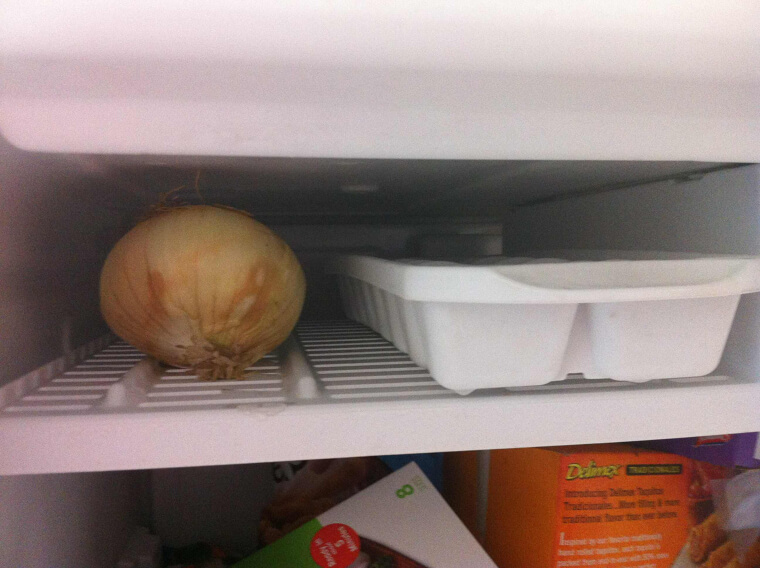
And this reduces the sulfuric acid that is done after slicing the onion. Before chopping the onions, place them in the freezer for about 15 minutes — chopping onions will become a more pleasant task.
This method will help you make the perfect crunchy taco shell.
We hope you know that tacos come in two kinds (just like you already know how much we love tacos): softshell and crispy. Latter: stick soft tortilla wraps along on your oven grill and bake, if you wish to make them yourself. The result? Homemade taco shells that crisp up so perfectly. This allows heat to surround the whole tortilla for a perfectly cooked, crispy result when draped over the oven grill racks.
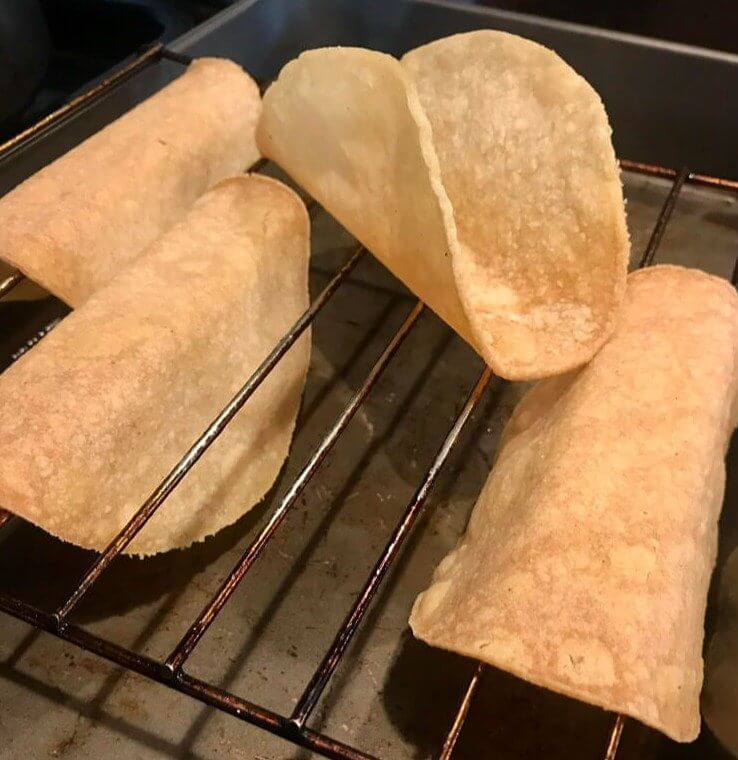
And, best of all, they can all be done in a matter of minutes! For a crunchier texture, spritz a few pumps of cooking oil spray on the tortillas prior to placing them in the oven.
Keep Reheated Pizza Moist by Placing a Glass of Water in the Microwave
We love cold pizza. It is delicious! But if you’d rather heat a slice (or two) back up, we’ll have your back in that department too. Then you just preserve your pizza on a microwave-safe plate/container together with a glass of water and microwave the pizza for a couple of minutes. Water also serves as a humidifier, preventing the microwave’s dry heat from suckering moisture from the slice (or slices), so of course, the trick will help to keep the pizza moist and crunchy.

The steam created from the heating water will prevent the pizza from getting too dry and tough, and the cheese from going rubbery. A simple hack can have a great impact on the final results of your reheated pizza!
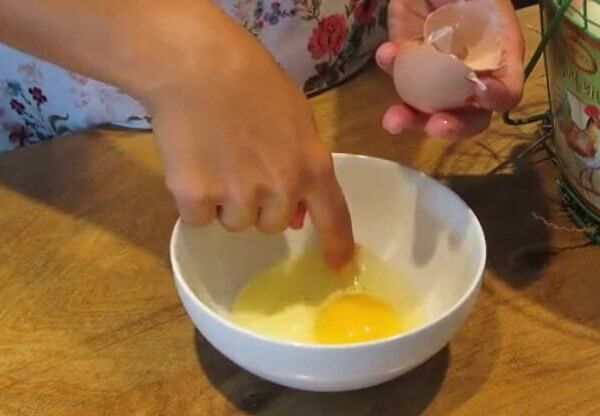
A Plastic Water Bottle for Quick and Easy Yolk Separation
Want to make a meringue? Or an egg white omelet? Maybe you found a recipe that calls for separating egg yolk from whites; or even egg white that sometimes appear in omelet recipes. If yes, here is this hack that can help you to do it damn perfectly without the mess. You do this by putting an egg in a bowl. After that take a plastic bottle with pharmacy graze and comfortably press the mouth of the bottle to the yolk.
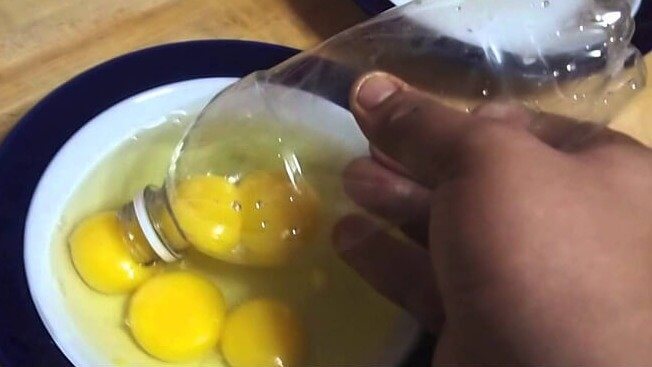
You just touch the bottle lightly top pull a tad of suction to suck the yolk, therefore separating egg yolk and white. For example, it is great to get a quick and mess-free separation of eggs if you’re using them for cooking.
Use a Rubber Band to Open Stubborn Jars
It can be aggravating when a jar is tight. But hey, this is an easier task if you use a rubber band. Just wrap a rubber band round the jar lid and then attempt to twist the jar lid off. The rubber band adds hold so it can turn easier when the cap is on tight. Grab jar: this method can also help home-chefs-pop-open those jam-and-jelly-glazed jars that seem nearly impossible to open if your hands are wet/slippery because hey, rubber band to the rescue again as it provides an extra level surface grip on the lid.
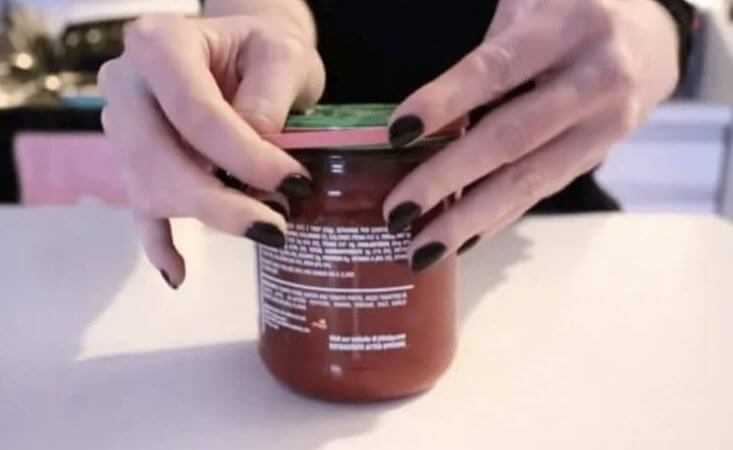
This is a basic but useful hack to help you regain all the time and energy when you have to open the extremely firm jars. And better yet, it saves you money compared to those jar opening tool things — so win-win!
Put Plastic Wrap Around Banana Stalks to Prevent Browning
Wrapping stalks of bananas in plastic wrap is one answer to halting the browning process. Do not leave the ends exposed. Why does this work? Bananas in fact give off the gas ethylene which induces ripening of the fruit. It helps contain the gas are released from the open end of the stalk, slowing the ripening and preventing the bananas from turning brown.
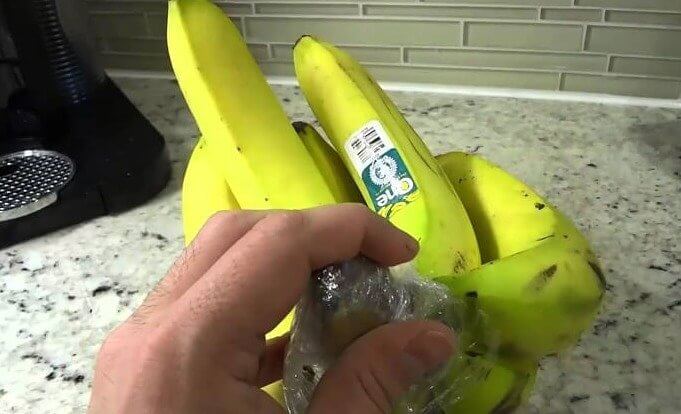
So, the next time you splurge and buy a bunch of bananas, give this trick a whirl. That will help keep this delicious fruit fresher and hobby, less waste!
Coffee Cubes – Never Have a Watery Iced Coffee Again
Well, first just make a pot of coffee like you normally would. Afterwards, leave it to cool down in room temperature or stick in the fridge if you are short in time. After it is cold enough, pour the coffee into an ice cube tray and freeze it. Pop the tray into the freezer for a few hours (or until the coffee has fully frozen). You can then just throw in the bits into a glass of cold milk or water – or a glass of joe! – to make iced coffee.
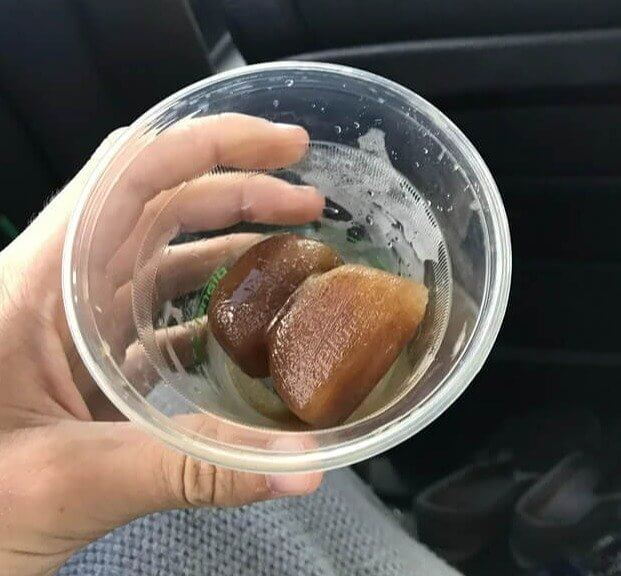
You can mix them into a blender with some milk, ice cream and sweetener to create a coffee milkshake. These coffee cubes will make your morning iced coffee child’s play to grab!!
Use Lemons to Stop Fish From Sticking to Grill Grates
Grilled fish is so tasty but tends to stick on the grill grates. Yet there is an easy but guaranteed method for grilling fish: placing slices of lemon to prevent salmon from sticking to your grill grates. Step 1: Prep Your Grill to High Heat. While the grill is preheating, slice a lemon and put the slices on your grill grates. Next, lay your salmon filets on top of the lemon slices.
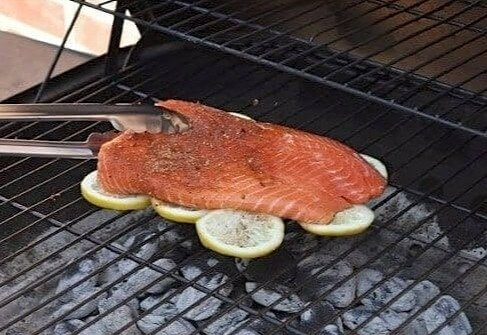
The acidity in the lemon juice coats the fish, making sure there is a protective layer between the fish and the grill grates, which prevents the fish from sticking to the grill and allows you to turn the fish without falling apart. Not to mention it adds a hint of citrus flavor into the fish!
Dip a Cake-Cutting Knife Into Warm Water Before Using It
The struggle of slicing desserts is real — cheesecakes, brownies, sponges — anything that barely holds itself together as it lands on your plate. On the other hand having wet knife can help alot in the cloves carving. Get yourself a piece of water in a container beforehand. And then, dip an edge of the knife in the water. The warmth of the water helps to soften the dessert and also makes it so that the blade has a lubricant to slide through so that there is less friction when slicing. It also keeps crumbs from adhering to the knife for a cleaner cut.
Just remember, after plating your first slice, give the knife a good wipe (else the debris from the dessert will ensure that the second slice is painful). Now do the same for every slice that you plate.
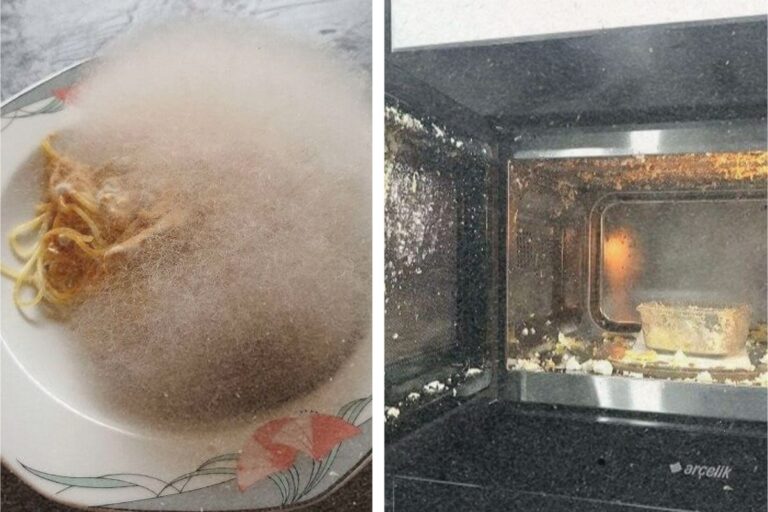
The Secret to Perfectly Poached Eggs Is (food-Grade and Heat-Resistant) Plastic Bags
One of the more difficult dishes to cook perfectly are poached eggs. But, how many times have we gone to poach an egg, only to end up breaking it in the pan and making a total mess? Plastic bags are the most beneficial solution, however, for this. To use this technique, place an egg in a plastic bag, seal it, then slowly submerse it into simmering water. It helps that the entire egg holds together better with the plastic bag, which reduces any risk of it spreading throughout the water. Just make sure its the right kind of plastic bag.
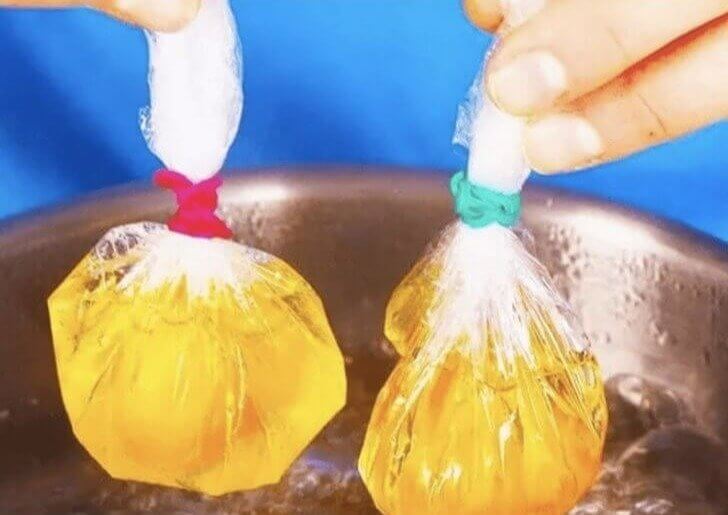
YouTube/حِرف إبداعية في 5 دقائق
It is worth mentioning that this bag must be made of food-grade and heat-resistant material. Ultimately, this hack should give you a runny yolk, white firm, poached egg.
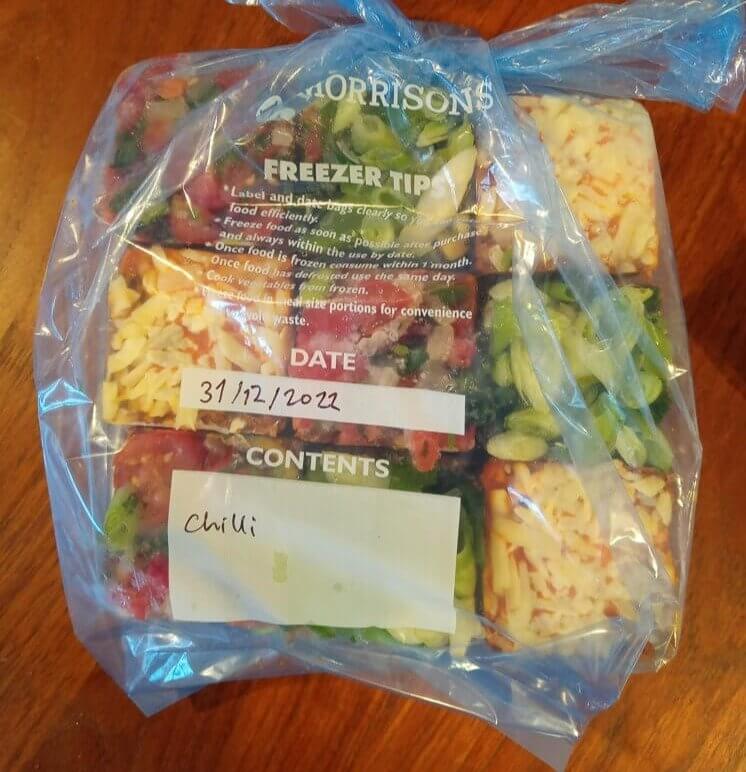
Freeze leftovers in ice cube trays. This makes it simple to serve and saves a lot of space.
If you are looking for a quick tip to make food wastage less likely happen to you, this hack is for you. Step one — fill the ice cube trays with any leftover sauce, dough, or any other ingredients that you might have kicking about. After that, stack the trays in the freezer. Put food in ice cube trays to make portions. This is particularly useful for recipes with smaller quantities of an item.
It’s also a good way to make sure that you have some different flavors ready to go, such as different sauces and broths that you can plop into future meals effortlessly.
Get the fat out of your stock by putting ice cubes in it.
Interestingly, you can skim the fat from your stock with ice cubes. It is a fast and efficient method. That said, this method is only to be used after the stock has been simmering for some time. Since the fat will only float to the top after it is hot enough. Now keep the stock simmering and drop some ice cubes in the pot.
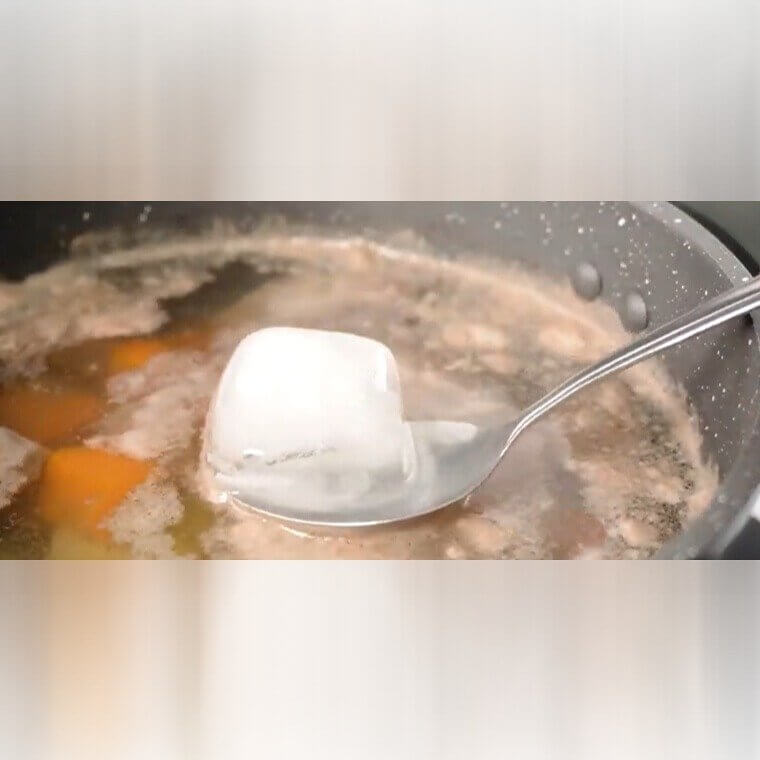
The ice cubes will make your fat solidify and come to the surface. With a ladle or spoon skim the fat that has risen to the top and solidified.
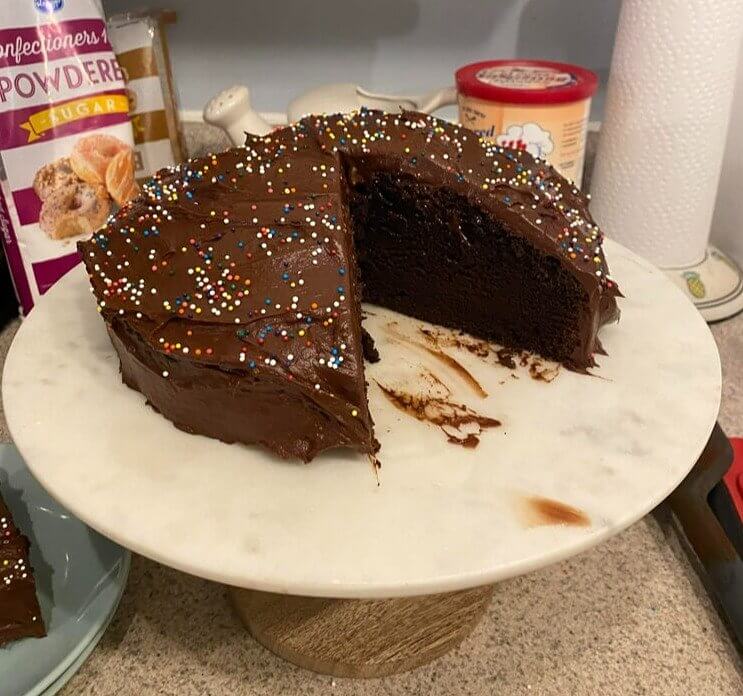
Putting slices of bread in your cake’s holes will help it last longer.
Want a cake to longer stay fresh? If that’s the case, attach a piece of bread to the exposed area of the cake with toothpicks. The bread needs to cover the edges of the cake but not the top & center. So the crust stays soft as the bread absorbs humidity. Cover the cake with a piece of plastic wrap or foil, or place it into a cake tin.

Sure, the bread will turn hard and kind of stale, but the bun underneath will remain fluffy and moist. Yum! Now I’m craving cake with all this talk about it.
To make sure your eggs are still fresh, put them in cold water.
A Simple Test Is To Drop An Egg In Cold Water To See If Its Gone Off If you put the egg in a bowl of water, a fresh egg will sink right to the bottom and lay on its side, whilst a spoiled egg will float at the top. Apparently it happens because the density is different between a fresh egg and a bad egg. As eggs get older, an air pocket develops in the big end of the egg, so they float in water.
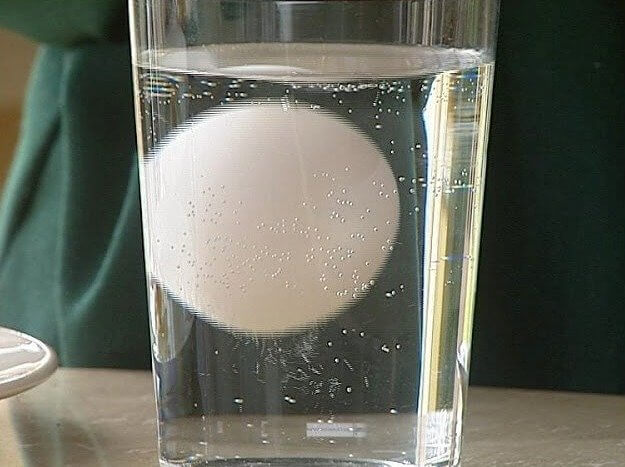
So, if the egg sinks to the bottom and rests on its side, it is still fresh. If, however, it rises to the top, it has already spoiled and should not be consumed.
How to Make Perfect Whip Cream Without Getting the Mixer Dirty
Mason Jar Whipping — the no mixer way to whip cream The cream must be cold, and the jar also must be dry and clean. Next, pour in the cream and any recommended sweeteners or flavorings, directly into the jar. Screw that lid on tight, and shake it for several minutes until the cream thickens and hits stiff peaks. The shaking action traps air in the cream, making it light and airy.
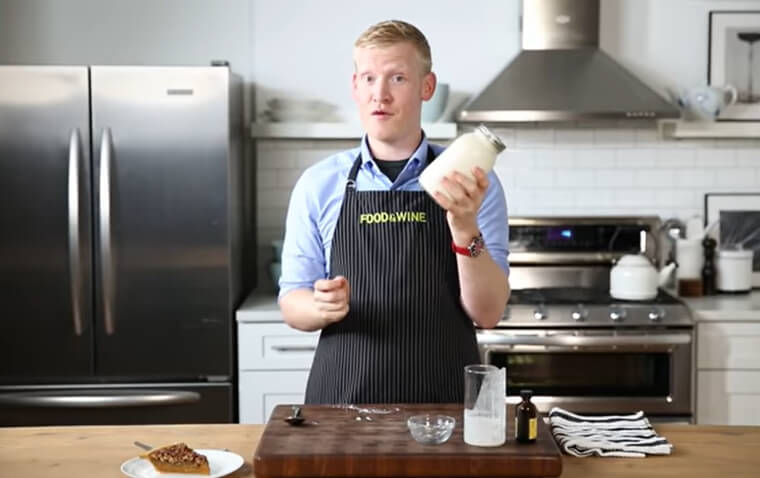
It’s mess-free because the mason jar contains the cream while you shake. It is perfect for small batches, requires no special equipment, so it is inexpensive as well, win-win!
Place an Ice Cube on Top of a Patty While It Cooks
To wed ice cube and hamburger patty in a way you never wandered was possible. It turns out, placing an ice cube on a sizzling meat patty can enhance its flavor. How? Actually, as the ice pellet melts, it liberates steam that prevents the meat from drying. The cube of ice also cools the exterior of the meat patty.
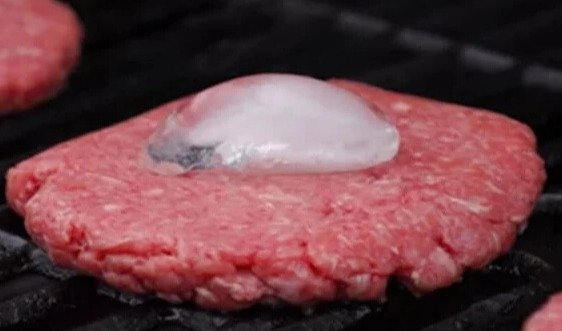
Hence, the meat is cooked at a gentle pace, giving the centre of the meat time to cook through before the outside gets too tough or charred. Or, not so worried about calories, you can throw in frozen cubes of butter. This has a similar effect.
Use a Muffin Tin to Serve Your Condiments With Ease
Are you out of ramekins or bowls to serve your dips in? Luckily, a muffin tin may be an awesome and simple serving dish for condiments to your party or event. You can stuff each muffin cup with a sauce like ketchup, mustard, mayonnaise, relish, or any other condiment you want! You can also add little spoons or forks on the tray along with these cups.
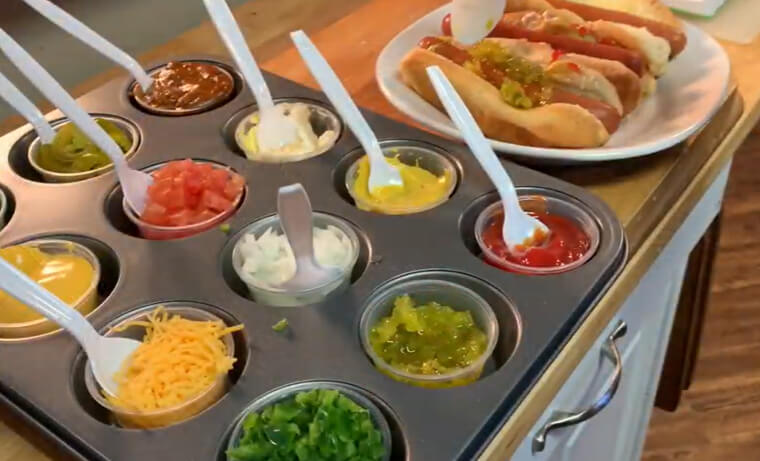
Alternatively you could write the name of spice on each cup using a small label or a label attached to the toothpick. So why not give it a go for your next fajita taco Tuesday?
Press Down on Garlic With the Flat Side of a Knife – It’ll Make Peeling a Breeze
Though peeling garlic can be a dull exercise, a wide knife could be used to simply tackle the task. The flat blade surface allows you to peel in a more efficient and effective manner. For this, just put the garlic clove on a chopping board and press on it with the side of the knife. Then the skin will come off the garlic with ease and you can use it in your recipe.
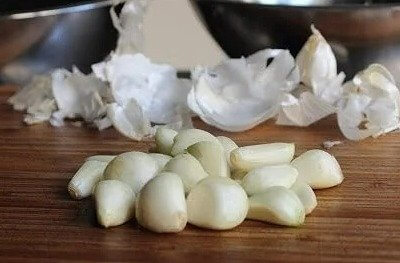
By doing so, it also helps reduce crushing or smashing of the garlic while you peel. This lets you not touch the garlic as much so your fingers are not as garlicky afterward!
Floss Is Your Best Friend When It’s Melon Slicing Season
You Can Use Floss to Cut Watermelon into Perfect Wedges If you’re doing the fruit for a party or something, this is a hack that’s quick and easy. So to begin with, chop the watermelon in half https://highsonlife.com/sweetwatermelon✌️ Cut some parallel lines through the flesh of the watermelon. Ensure that each of these cuts goes from the top of the watermelon to the rind. Afterwards, run the floss along the flesh side of the rind to free up the watermelon from it.
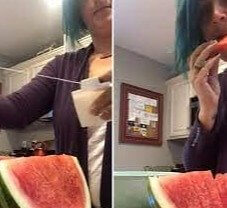
And voila! So you can have watermelon wedges all ready to go for any guests — or just yourself; we don’t judge.
Spray Some Apple Juice on Your Meat to Keep Things Moist While Grilling
Fill a spray bottle with apple juice and spray on the meat as it cooks on the grill. Remember to season your meat to your taste before adding it to the grill. Then every few minutes while the meat is cooking, spray the apple juice on the meat. Not only does it work to season meat, using some salt and the small amount of sugar present to impart some delicious flavor and a hint of sweetness, it also serves to inject some moisture into the meat to help keep it juicy and moist.
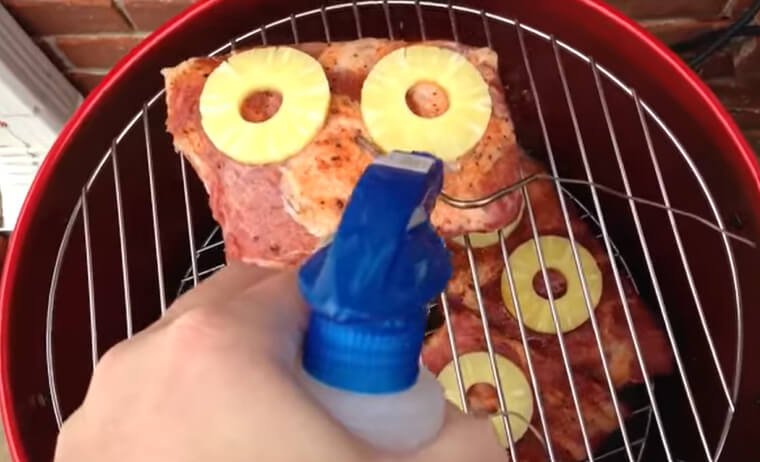
Secondly, it uses a spare spray bottle to apply the apple juice, making sure that the meat is coated. This also stops you from accidentally drowning the meat in juice.
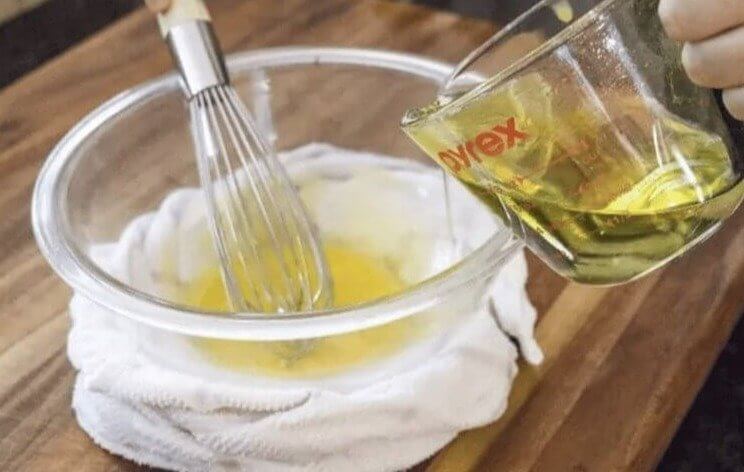
Soften Butter the Perfect Amount by Placing It Inside an Upside Down Glass
Are you getting some butter from the refrigerator for baking or for bread and toast and the butter is too hard to handle? Cut the butter up into cubes, no bother! Next put them under heat-resistant glass — like a Pyrex measuring cup or mason jar. The trapped heat of the glass will again warm up the butter, thus,it becomes easier to work with.
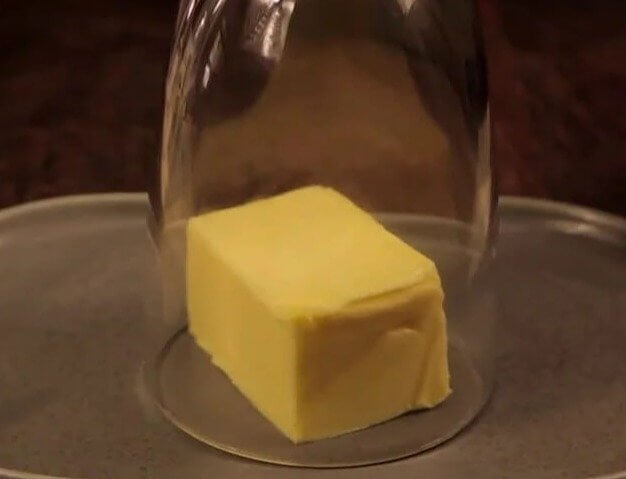
The butter isn’t going to melt all the way but it’ll be softened to the point where you can slice and spread it. That is, if you are cooking and need softened butter in a hurry — don’t have time to allow it to sit at room temperature.
Dice Herbs More Efficiently by Using a Pizza Cutter
When it comes to prepping your herbs for cooking, one of the fastest and safest ways to do it is by using a pizza cutter. Just place your herbs on a cutting board and roll the pizza cutter back and forth over the herbs. The pizza cutter is very sharp, and will really slice right through the herbs. Just be sure to avoid rolling over your fingers by mistake! The round cutter shape gives it a rocking motion, and you can chop large amounts of herbs with it easily.
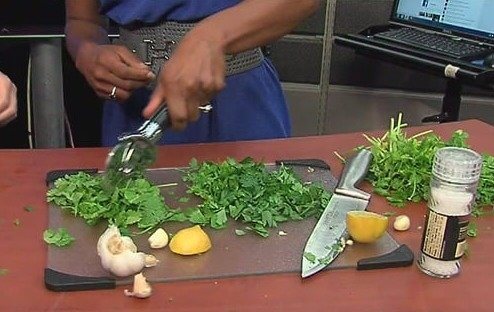
So this technique is ideal for tender herbs like parsley or cilantro that can be more difficult to chop with a chef’s knife. Plus, it is a lot safer than a sharp knife!
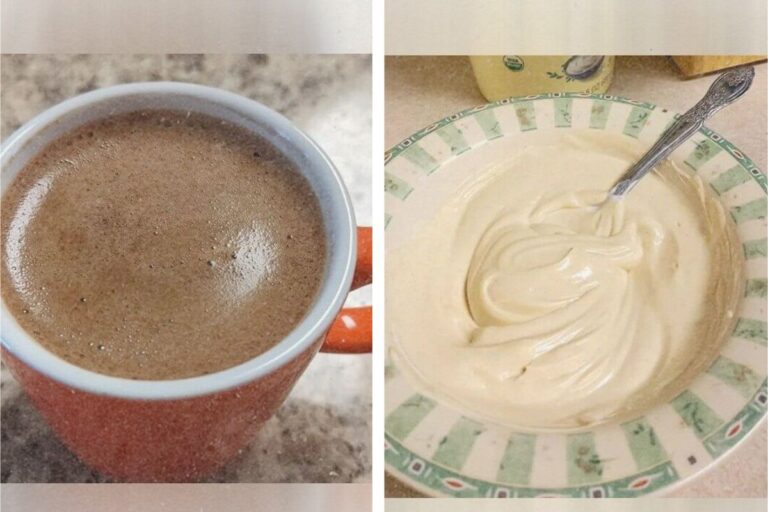
Create Perfect Milk With Only a Microwave
Easy and cheap way to get that fancy looking frothy milk without the tools. So, first part is you take a jar fill it with milk pour in just a little bit of sugar. Close the jar and shake briskly for about a minute or until frothy. After that, take the lid off and pop the jar in the microwave for about 20–30 seconds (the power of your microwave can affect the total time). The heat will make more foam and it will also make the milk expand.
It makes truly yummy and foamy milk that you can top off your cappuccinos, lattes, and other homemade specialty drinks with. Way cheaper than heading to the coffee shop down the street, right?
Keep Your Salad Crispy and Fresh by Storing It Above a Bag of Ice
If you want to keep salad from getting soggy, you can pick up a zipper-lock bag. Pack it with ice, squeeze all the air out, and tightly seal it. After that, set the salad on the bag of ice, and go ahead and put it in the fridge. The ice helps keep vinaigrette and salad cold and crisp, and the zipper-lock bag keeps salad from going mushy. It’s a good way to keep salad fresh for a day or two.
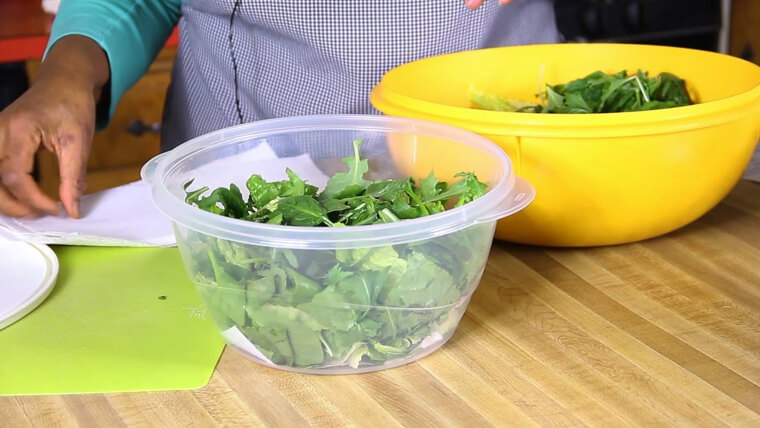
Or, to keep fruits and veggies fresh. However, if you want to keep the salad fresh for long periods, just be sure to drain the melted ice and add new ice as needed.
Peel Ginger With Ease Using This Spoon Trick
Ginger root can be a little tricky to peel, but one method that works easily and effectively is to use a spoon. First, you want to take a spoon in one hand and hold the ginger with the other hand. Then, hold the spoon against the skin of the ginger, and gently but firmly push down the rounded edge of the spoon to scrape off the skin. Do this all over the ginger root.

As you turn the ginger, continue with the peeler until you are left with only the peeled stays of ginger. This method is ideal if you would rather not waste any ginger, and avoid cutting yourself on a very sharp knife.
Stop Peanut Butter From Separating by Storing It Upside Down
Most of us know that peanut butter greases. This is because of the natural oil content of the nuts. To avoid this, turn your jar of peanut butter upside down so that the peanut butter stays mixed more evenly. That is effective because once the jar is upside down, the oil helps to redistribute to a point where the separation cannot happen. It also works for other nut butter, such as almond butter, sunflower seed butter, and so on.
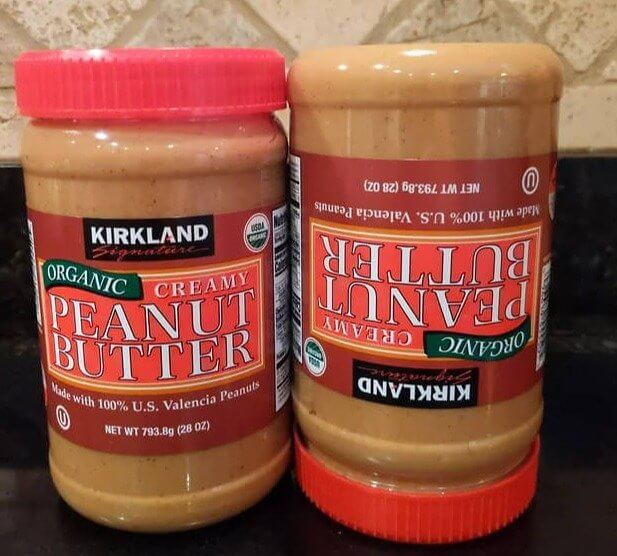
No more mixing your peanut butter before you can use it, so there you have it. Just remember to close it well, otherwise, it can leak!
Easy Way to Get Fruit Ripe Quickly: Pack it up in a paper bag.
It takes patience to await the ripening of fruit to the ideal eating state. The solution: Place the fruit and veg (think avocado) that you want to ripen into a paper bag and close it using an elastic band. It achieves this by enclosing the emitted ethylene (natural hormone rice for ripening) gas inside the paper bag. This is also the reason why this hack speeds the ripening process.
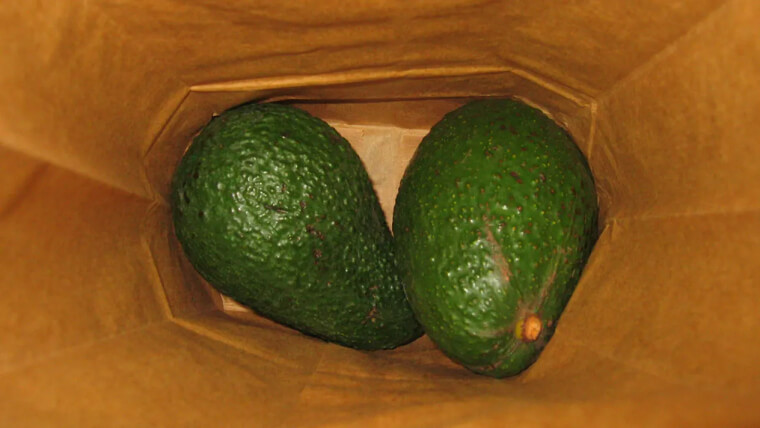
Keep the bag somewhere at room temperature for a day or two and you have yourself a bowlful of delicious ready-to-eat fruit. One note of interest is that since apples and bananas are actual high level ethylene producers, this trick is especially helpful for both of these fruits when it comes to ripening.
A dollop of mayonnaise is all you need to make a fantastic homemade burger patty.
Only a dollop of mayo make your burger patty mix taste good. Mayonnaise consists of eggs, oil and vinegar, which contribute moisture and taste to the meat. More precisely, mayonnaise’s acidity disintegrates the proteins in the meat, producing better-tasting and more tender hamburgers. And the oil in the mayo helps to hold the moisture in the burgers as they cook keeping them juicy. Mayo also has emulsifiers to help bind everything much better than the egg you might use and keep the burger from falling apart.
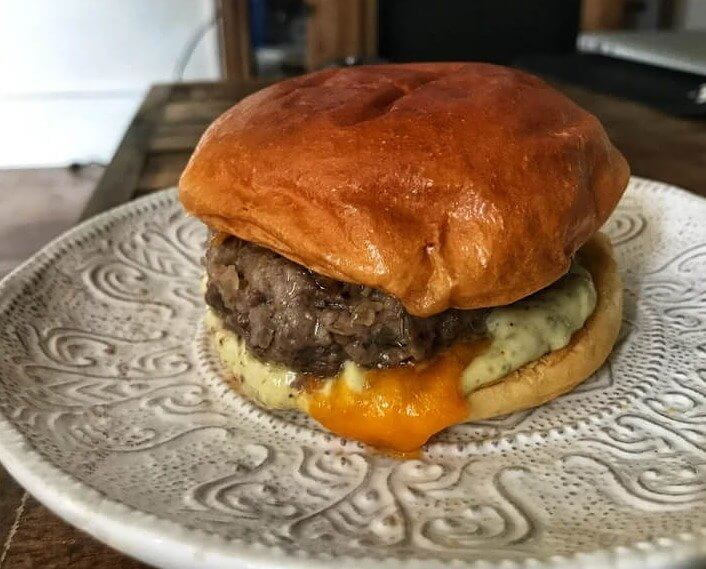
So, if you want to mix-in a little spoonful of mayo into your burgers, then just go ahead and blend in a tablespoon or two per pound of ground beef and judge for yourself!
Use this type of wooden spoon to keep pots from overflowing when they are hot.
Lack of best practice with boiling pots overflowing irritants. However, luckily for us, there is a useful hack to avoid all of that. Simply pick up a wooden spoon and rest it across the top of your pot. The wooden spoon disrupts the bubbles on the surface of the water, preventing them from forming and/or growing large enough to overflowing the pan.
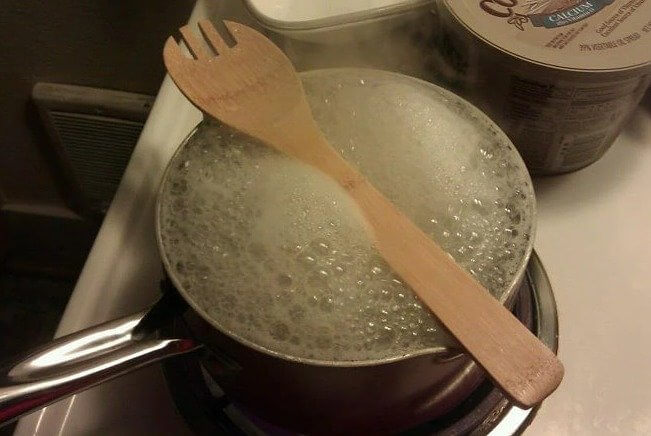
This trick is so easy and helps prevent boilover when cooking pasta, rice, potatoes, vegetables, or anything else that has a tendency to boil over. It leaves us asking how we didn’t learn this hack sooner!
Dip Your Fingers Into Cold Water to Easily Dig Out Fallen Eggshell Pieces
We’ve all done it. Given, we have all broken an egg into a bowl when we then needed to understand that we had successfully obtained a few coverings into the batter. Annoying, right? That technique is a great one because the little bits of eggshell come right out without a bowl or tool to jeopardize the egg itself. First, you want to crack the egg into a bowl. After that, wet your fingers in cold water.
With your fingers wet, remove any pieces of shells you see by hand. The egg whites will shrink in the cold water. It also acts as providing an easier grip of the shell.
DIY Jell-O Worms
This is what you need to make the DIY Jell-O worms at home: Straws. Step 1: Make your Jell-o according to the packaging Allow the jello to cool to room temperature and thickened slightly, then pour the jello into a plastic straw. Do this when the jello is thickened but not yet “set.” There are two ways you can facilitate this; with a syringe or a turkey baster. After filling, tie a knot in the top of each straw to keep the Jell-o inside.
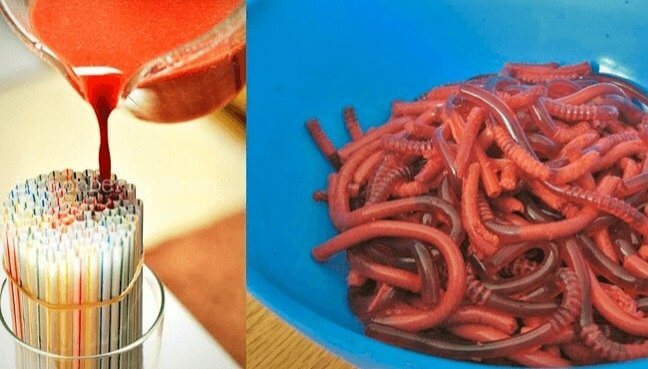
Allow the straws to chill in the fridge for at least four hours. Finally, when your Jell-O is nice and solid, squeeze the straws so the ‘worms’ will pop on out.
Yes, You Can Use Microwaves for Barbequing Meat
If you are a fan of grilling, using the grill option on your microwave is a great way to get that barbecue taste without using the grill. All you have to do is place your meat on a microwave-safe plate and pop it in the microwave. Afterward, you switch on the grill function, which heats the microwave’s top heating component to a high temperature like a conventional grill. This gives the meat that traditional BBQ sear and taste.
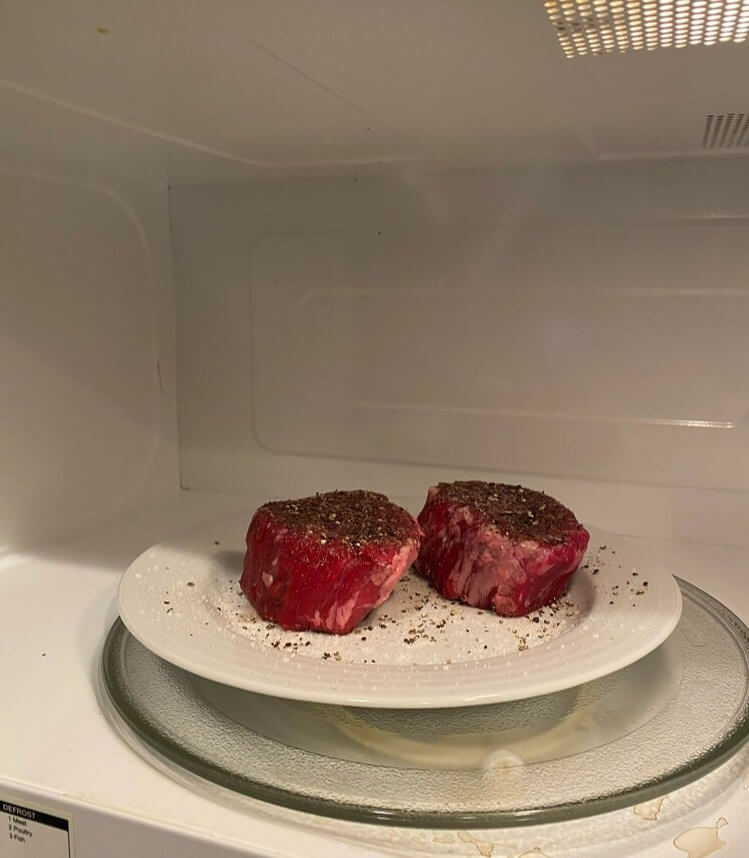
Prepare your meat as desired, and let sit for a few minutes before serving. Here you have it, beautiful BBQ without the effort — ideal if you’re only BBQ’ing for one!
Lightly Coat the Spoon or Cup in Oil Before Measuring Honey
Using oil to coat the spoon or measuring cup, when you no measure honey. It optionally can be performed with a paintbrush or even simply your pointer. The oil acts as a barrier that prevents the honey from sticking to spoon or cup. You can also use it for pouring honey from the jar — coat a little bit of the rim of the jar with oil to keep from honey from getting stuck to the rim and becoming messy.
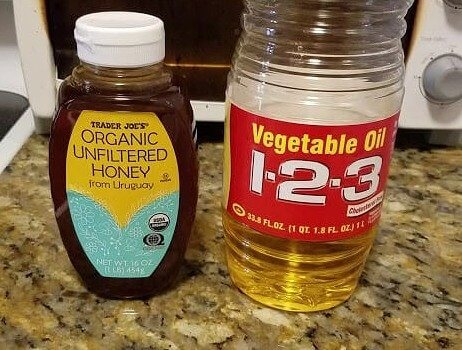
It is important that when using the oil it is in light touches because if we add too much, the honey will become more liquid and cumbersome to manipulate. Another thing to keep in mind is that some honey types come with an even higher tendency to stick.
The Best Lemon-Squeezing Method You’ll Ever See: The Tongs’ Method
Tongs, squeeze the lemons with tongs to get the juice out only from the fruit. With a tongs, you can exert more force on the lemon than with a standard citrus squeezer. Even more so, you can place the tongs where you want to squeeze the lemon to help you obtain more juice. It also prevents all that lemon juice from getting onto your fingers – which is quite the mess! – tongs are also much easier to clean.
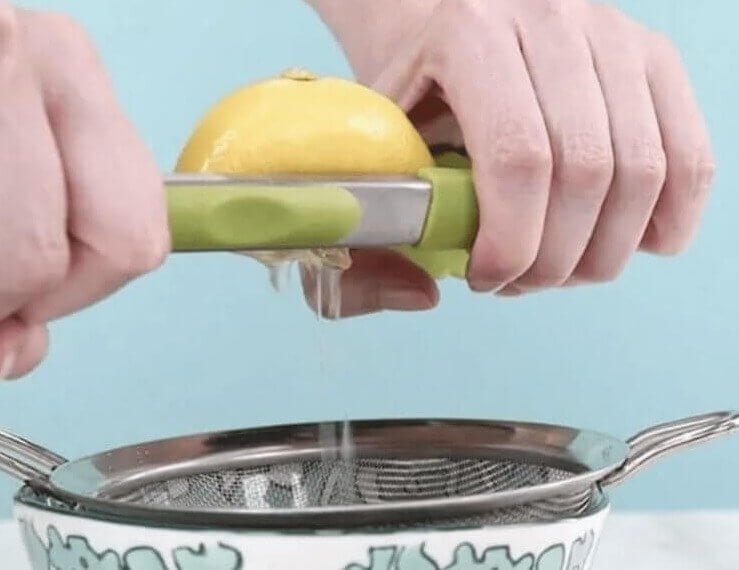
Naturally, you could also use this technique for squeezing other citruses— oranges, limes, grapefruits, and so on. It is recommended to take a bowl as in the picture and put a sieve over it. Then squeeze the fruit over the sieve to catch the pips.
Use a Potato Masher to Mash Your Way to a Great Guacamole
The most foolproof method of serving up an avocado is by mashing it, and you want a masher for delicious guacamole,730/445/109. Masher – A masher is great for guacamole as it mashes down the avocados in a consistent fashion, but does not puree them. It leads to a chunky, creamy guacamole with a good texture contrast. And the best part? Its range of motion is entirely controlled by you, which means that it’s the you, the guacamole masher, who determines just how smooth or lumpy your guacamole will be.
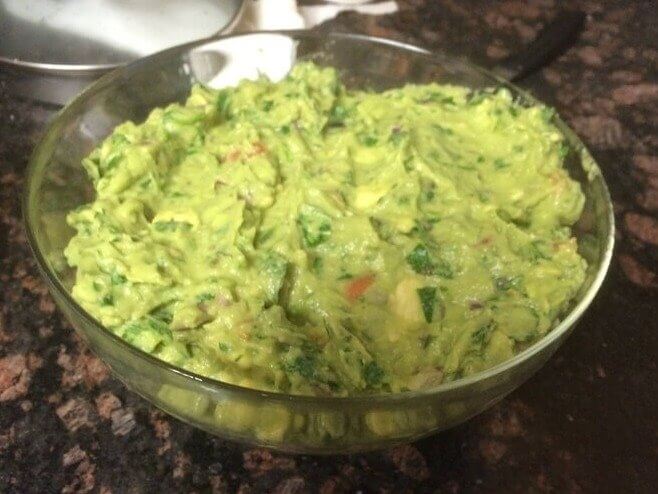
You can mash it to your desired level of smoothness. You can also smash in other things like tomatoes, onions, cilantro, and lime to mix them up more thoroughly.
How to Peel Tangerines Without the Mess
So How to Peel a Tangerine!Peeling a tangerine is easier said then done! This method, however, frees one of the skin of a tangerine as well as splits the fruit into pieces with ease and no mess. Firstly, using a sharp knife, peel open the tangerine, 1/4 inch afar from the stem of the fruit. Cut away one section, then work your way around the fruit, and peel off the rest in one long piece.
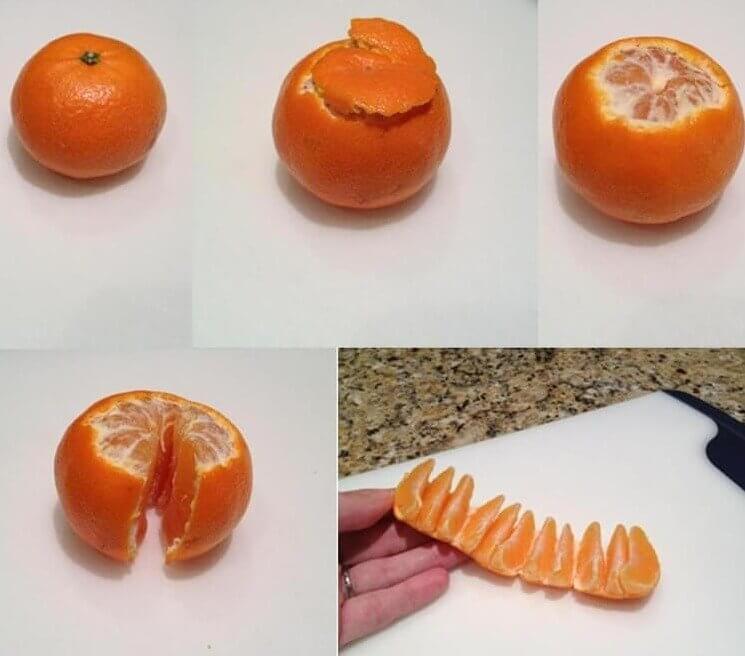
Another smidgen of an added bonus for peeling your tangerine this way is that you will be able to eat the fruit without the taste malice of the white pith. Healthy snack, anyone?
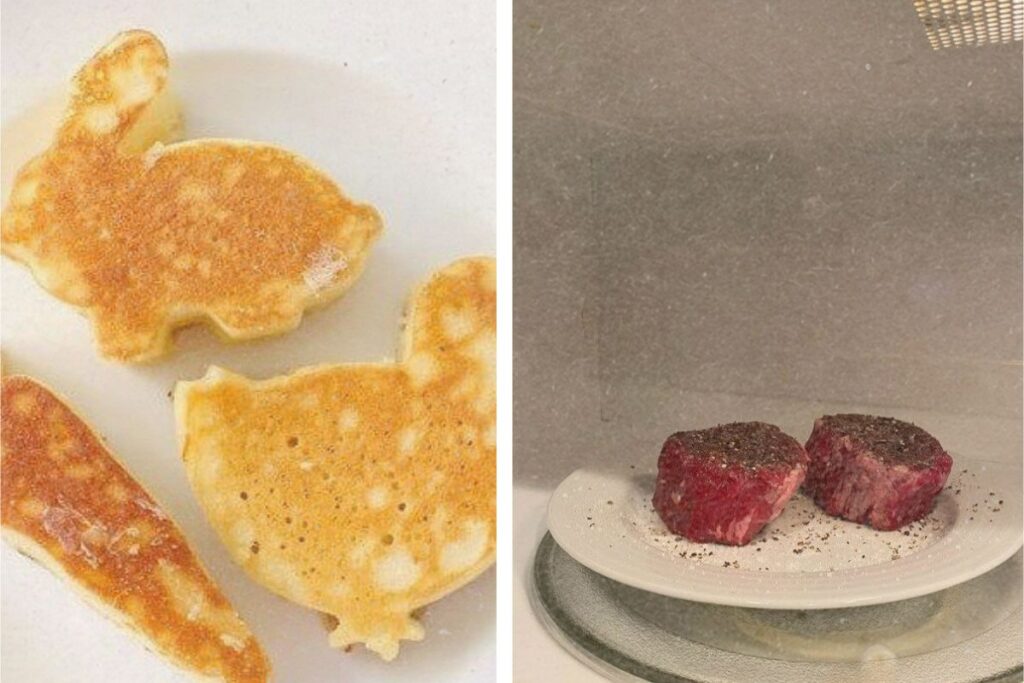
Make Cute Pancakes Using Cookie Cutters
One such way is to use pancake cookie cutters to make cute pancake shapes without any hassle. The process is simple. What you need: — Cookie cutters in various shapes, Nonstick pan (or skillet), Your pancake batter, Squeezy bottle (like this one I used in the photo) Steps to Prepare Prepare the pan or skillet on medium heat. When the making pan is heated, carefully grease it with butter / oil.

Then, place some batter into a squeeze bottle or a Ziplock with a tiny hole cut in one of the corners. Finally, place the cookie cutter on the pan and fill it with the mixture. Wait until the edges firm up before carefully lifting the cookie cutter up and off the pancake.
Use an Ice-Cream Scoop to Remove Pumpkin Seeds
An ice cream scoop to hollow out pumpkins, melons, squash and so on offers a quick and clean method of preparing such fruits or vegetables for cooking or baking. First, slice the pumpkin in half (or any seeded fruit/veg you are dealing with). Next, take the scoop and scrape the seeds and stringy bits from the inside of the pumpkin. The scoop is shaped perfectly for removing the seeds and doing so without tearing up the flesh of the pumpkin itself.
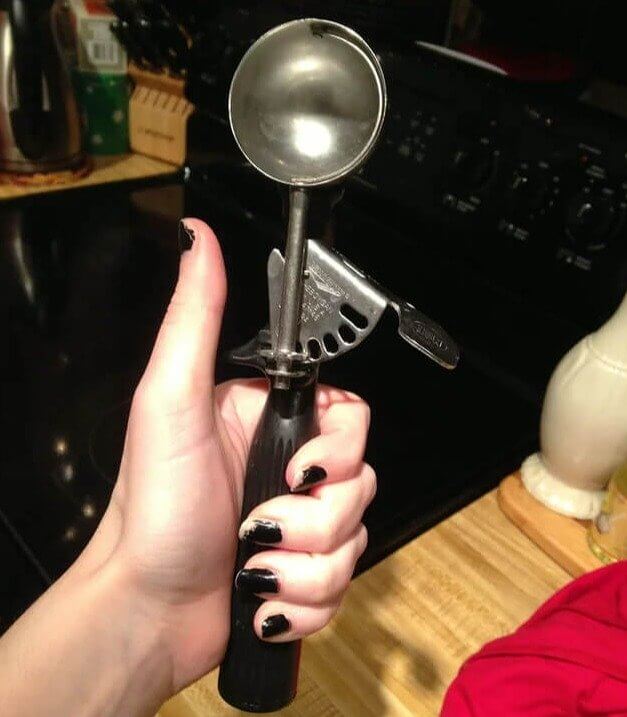
If you’re using an ice cream scoop, make sure it is sharp and clean to not crush the fruit or pumpkin. You can also use a tablespoon or melon baller for an ice cream scoop.
Prevent Bowls From Sliding off the Countertop
If you are using a bowl that tends to slip, wrap it in a towel or cloth. The towel is like place-mat for the bowl, it gives the bowl traction so it doesn’t slide around during use. For Performing This Hack, Take A Towel Or A Wastecloth, Fold It From Middle. Now put the bowl on top of the towel that you folded. Now, cover the bowl bottom and sides with the towel or cloth.
It helps because that towel or cloth adds friction between the bowl and the surface on which it’s resting, so it keeps the bowl from sliding around and causing a countertop spill.
How to Make the Perfect Grilled Cheese in the Oven
Make the perfect toasties with your oven cooking for your grilled cheese. This ensures the bread is toasted evenly and the cheese fits like a glove. It also gives you the ability to make multiple sandwiches at a time, so you can feed the whole frickin’ crowd. This also helps reduce the amount of cheese that oozes out and gets all over the sheets. All you need to do is set the oven to 350-375°F and put the sandwiches together.

If you want them to taste the best, butter the exterior portion of each slice of bread. Then, put the sandwiches on a baking sheet and bake for 8-10 minutes, or until the bread is toasty and the cheese is melted.